Async 함수는 내부적으로 어떻게 동작할까?
카테고리: JavaScriptJune 21, 2022
async 함수가 내부적으로는 어떻게 동작하는지 브라우저의 이벤트 루프와 연관 지어 정리해보았습니다.
바벨 트랜스파일링
아래의 코드를 생각해봅시다:
async function asyncFunc() {
  console.log('asyncFunc 1');
  const a = await 'asyncFunc 2';
  console.log(a);
  const b = await new Promise(resolve => setTimeout(resolve, 1000, 'asyncFunc 3'));
  console.log(b);
}

asyncFunc();
console.log('after asyncFunc');
위 코드의 실행결과는 다음과 같습니다:
asyncFunc 1
after asyncFunc
asyncFunc 2
asyncFunc 3
어떻게 이런 동작이 수행되는지 차근차근 살펴보겠습니다.
우선, 바벨을 이용하여 위 코드를 async 함수가 지원되지 않는 환경에서도 동작하는 코드로 변환하면 아래와 같은 코드가 됩니다:
function asyncGeneratorStep(gen, resolve, reject, _next, _throw, key, arg) {
  try {
    var info = gen[key](arg);
    var value = info.value;
  } catch (error) {
    reject(error);
    return;
  } if (info.done) {
    resolve(value);
  } else {
    Promise.resolve(value).then(_next, _throw);
  }
}

function _asyncToGenerator(fn) {
  return function () {
    var self = this, args = arguments;
    return new Promise(function (resolve, reject) {
      var gen = fn.apply(self, args);
      function _next(value) {
        asyncGeneratorStep(gen, resolve, reject, _next, _throw, 'next', value);
      }
      function _throw(err) {
        asyncGeneratorStep(gen, resolve, reject, _next, _throw, 'throw', err);
      }
      _next(undefined);
    });
  };
}

function asyncFunc() {
  return _asyncFunc.apply(this, arguments);
}

function _asyncFunc() {
  _asyncFunc = _asyncToGenerator(function* () {
    console.log('asyncFunc 1');
    const a = yield 'asyncFunc 2';
    console.log(a);
    const b = yield new Promise(resolve => setTimeout(resolve, 1000, 'asyncFunc 3'));
    console.log(b);
  });
  return _asyncFunc.apply(this, arguments);
}

asyncFunc();
console.log('after asyncFunc');
위 코드가 어떻게 동작하는지 차례대로 살펴봅시다!
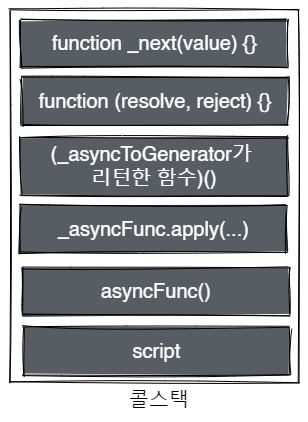
1.
제일 먼저, 코드 맨 아래에 있는 asyncFunc(); 구문을 통해 asyncFunc 함수를 호출합니다.
asyncFunc();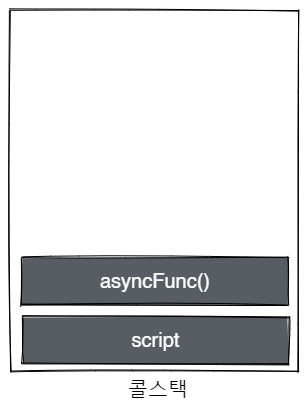
2.
호출한 asyncFunc에서 _asyncFunc 함수를 호출합니다.
function asyncFunc() {
  return _asyncFunc.apply(this, arguments);}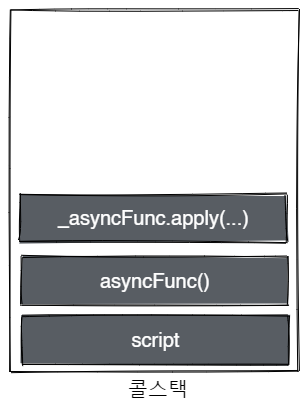
3.
2.에서 호출한 _asyncFunc 함수 내부에 진입하게 되면, 우선 _asyncToGenerator 함수에 인자로 제너레이터 함수를 넘기고 있음을 알 수 있습니다. 이때, 제너레이터 함수의 바디를 살펴보면 트랜스파일링 하기 전의 async 함수와 거의 흡사함을 알 수 있습니다:
// 원래 함수
async function asyncFunc() {  console.log('asyncFunc 1');
  const a = await 'asyncFunc 2';  console.log(a);
  const b = await new Promise(resolve => setTimeout(resolve, 1000, 'asyncFunc 3'));  console.log(b);
}

// _asyncToGenerator에 인자로 넘겨지는 제너레이터 함수
function* () {  console.log('asyncFunc 1');
  const a = yield 'asyncFunc 2';  console.log(a);
  const b = yield new Promise(resolve => setTimeout(resolve, 1000, 'asyncFunc 3'));  console.log(b);
}
위 두 함수를 잘 보시면, async function 키워드가 function*으로 (즉 async 함수에서 제너레이터 함수로), await 키워드가 yield로 바뀐 것을 볼 수 있습니다.
앞서 호출한 _asyncToGenerator(function*() {...}); 함수가 익명함수를 리턴하고 있으므로, 이에 따라 위 코드를 아래와 같이 바꿀 수 있습니다:
function _asyncFunc() {
  _asyncFunc = function () {
    var self = this, args = arguments;
    return new Promise(function (resolve, reject) {
      var gen = fn.apply(self, args);
      function _next(value) {
        asyncGeneratorStep(gen, resolve, reject, _next, _throw, 'next', value);
      }
      function _throw(err) {
        asyncGeneratorStep(gen, resolve, reject, _next, _throw, 'throw', err);
      }
      _next(undefined);
    });
  };
  return _asyncFunc.apply(this, arguments);
}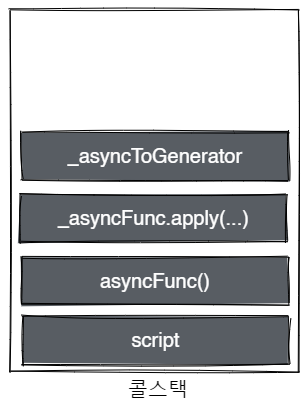
그리고 마지막줄의 return _asyncFunc.apply(this, arguments);는 결국 _asyncToGenerator가 반환한 익명함수를 호출하는 것이므로, 아래와 같이 바꿀 수 있습니다:
function _asyncFunc() {
  _asyncFunc = function () {
    var self = this, args = arguments;
    return new Promise(function (resolve, reject) {
      var gen = fn.apply(self, args);
      function _next(value) {
        asyncGeneratorStep(gen, resolve, reject, _next, _throw, 'next', value);
      }
      function _throw(err) {
        asyncGeneratorStep(gen, resolve, reject, _next, _throw, 'throw', err);
      }
      _next(undefined);
    });
  };
  return new Promise(function (resolve, reject) {
    var gen = fn.apply(self, args);
    function _next(value) {
      asyncGeneratorStep(gen, resolve, reject, _next, _throw, 'next', value);
    }
    function _throw(err) {
      asyncGeneratorStep(gen, resolve, reject, _next, _throw, 'throw', err);
    }
    _next(undefined);
  });
}
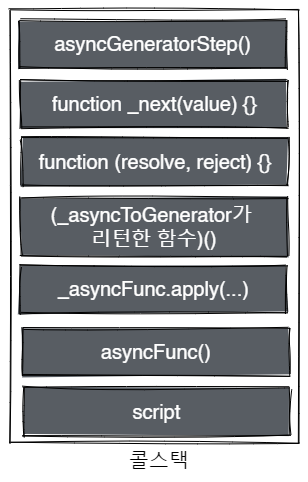
4.
다음으로, function _asyncFunc()에서 프로미스를 리턴하기 전에 해당 프로미스 객체 생성자에 전달된 함수를 실행하게 됩니다. 이때 var gen = fn.apply(self, args) 부분을 다음과 같이 바꿔볼 수 있습니다:
function (resolve, reject) {
  var gen = 제너레이터로_변환된_async_함수.apply(self, args);  function _next(value) {
    asyncGeneratorStep(gen, resolve, reject, _next, _throw, 'next', value);
  }
  function _throw(err) {
    asyncGeneratorStep(gen, resolve, reject, _next, _throw, 'throw', err);
  }
  _next(undefined);
}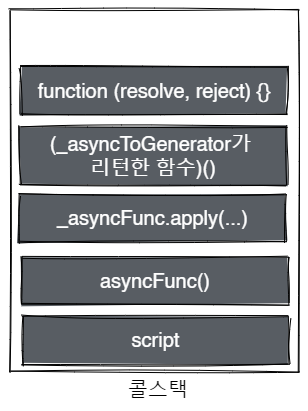
위 코드의 하이라이트된 부분이 실행되면, 앞서 살펴본 제너레이터로 변환된 async 함수의 제너레이터 객체가 gen 변수에 저장되고, 곧이어 _next(undefined); 구문을 통해 function _next(value) {...}를 실행합니다.
5.
4번에서 실행한 _next(value) 함수에서 asyncGeneratorStep() 함수를 호출합니다:
// 호출
asyncGeneratorStep(gen, resolve, reject, _next, _throw, 'next', value);

function asyncGeneratorStep(gen, resolve, reject, _next, _throw, key, arg) {
  try {
    var info = gen[key](arg);
    var value = info.value;
  } catch (error) {
    reject(error);
    return;
  } if (info.done) {
    resolve(value);
  } else {
    Promise.resolve(value).then(_next, _throw);
  }
}
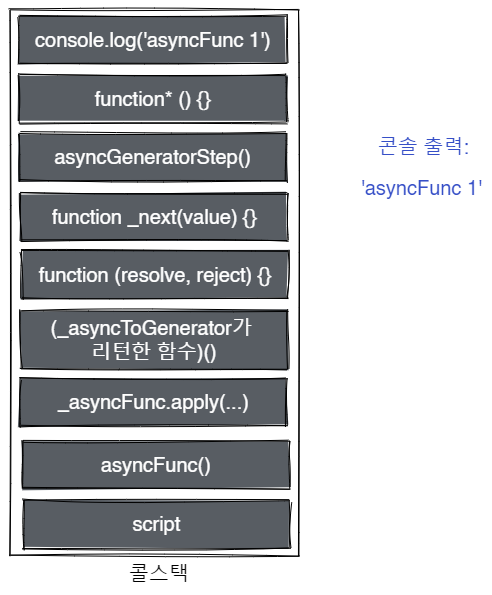
그러면 asyncGeneratorStep() 함수에선 먼저 아래 구문을 실행합니다:
var info = gen[key](arg);이때, 현재 key의 값은 'next'이고, arg의 값은 undefined 이므로 위 코드는 아래와 같다고 할 수 있습니다:
var info = gen.next(undefined);즉, 제너레이터로 변환된 async 함수의 제너레이터 객체에 undefined를 인자로 next() 메서드를 호출한 것이죠! 이 코드를 통해, 제너레이터로 변환된 async 함수의 첫 번째 yield가 나올때까지 해당 제너레이터 함수를 실행합니다:
function* () {
  console.log('asyncFunc 1');
  const a = yield 'asyncFunc 2';
  // ...
}
따라서 콘솔창에 asyncFunc 1이 출력되고, 제너레이터 함수에서 'asyncFunc 2'를 yield 합니다.
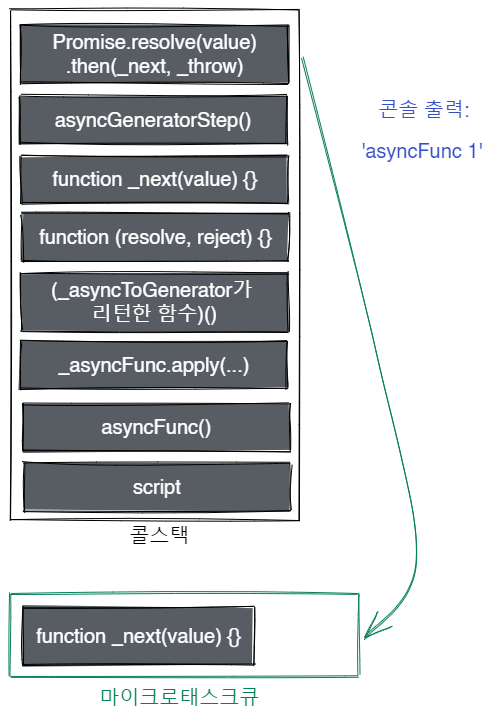
그리고 반환된 'asyncFunc 2' 문자열이 asyncGeneratorStep 함수의 value 변수에 저장됩니다:
var info = gen[key](arg);
var value = info.value;
그리고 이후의 if-else문을 통해, 제너레이터 함수가 전부 실행된 경우 if문을 수행하여 resolve(value)를 통해 원래의 async 함수가 리턴하는 프로미스를 resolve 합니다.
if (info.done) {
  resolve(value);
} else {
  Promise.resolve(value).then(_next, _throw);
}
현재 살펴보고 있는 코드의 경우, 아직 제너레이터 함수가 실행을 끝마친 것이 아니므로 else문을 실행합니다. 이때, 앞서 제너레이터가 yield한 값 value로 프로미스를 resolve한 다음, .then() 메서드를 통해 _next(에러인 경우 _throw) 메서드를 마이크로태스크큐에 등록합니다.
6.
_next 함수를 마이크로태스크큐에 등록하고 나면 여태껏 실행했던 함수들이 모두 종료되는데, 이때 _asyncFunc() 에서 반환한 프로미스를 최초에 호출했던 asyncFunc() 함수에서 반환하게 됩니다:
function asyncFunc() {
  return new Promise(function (resolve, reject) {
    var gen = fn.apply(self, args);
    function _next(value) {
      asyncGeneratorStep(gen, resolve, reject, _next, _throw, 'next', value);
    }
    function _throw(err) {
      asyncGeneratorStep(gen, resolve, reject, _next, _throw, 'throw', err);
    }
    _next(undefined);
  });
}
이는 async 함수가 무조건 프로미스를 반환한다는 사실과 일치하는 결과입니다.
그리고 asyncFunc()를 호출하던 구문 바로 다음에 있는 console.log('after asyncFunc')까지 실행되고, 콜스택이 비게 됩니다:
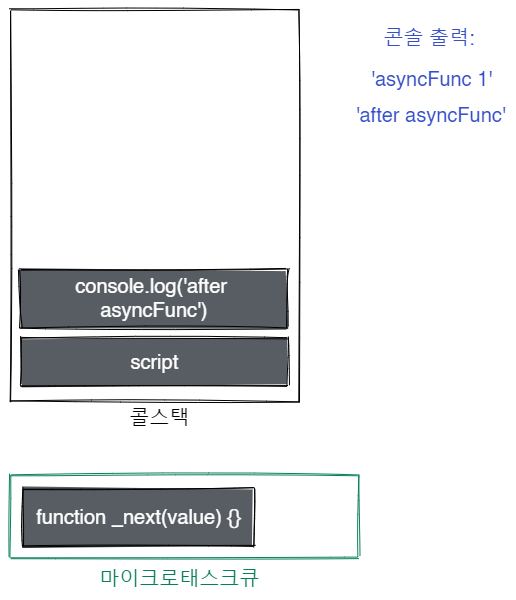
7.
이제 콜스택이 비었으니, 이벤트 루프가 마이크로태스크큐에 있는 모든 마이크로태스크를 처리합니다.
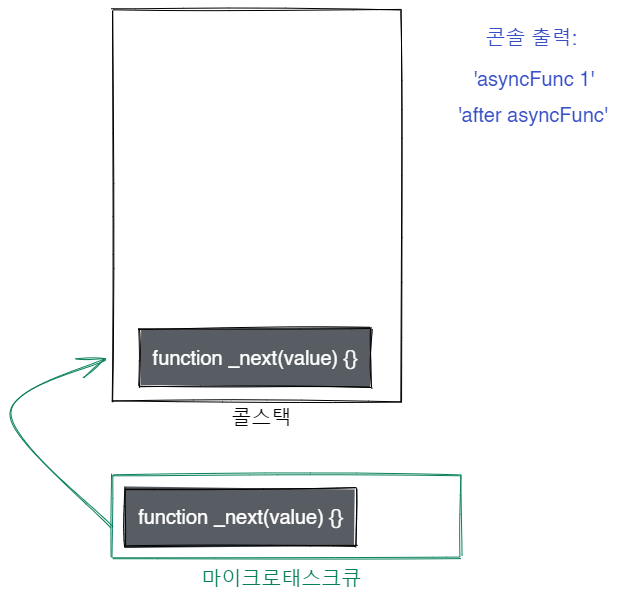
이때, 앞서 살펴봤듯이 _next 함수의 value 인자에 전달되는값은 제너레이터가 직전에 yield한 값이됩니다:
var info = gen[key](arg);
var value = info.value; // 제너레이터에서 yield한 값
// ...
Promise.resolve(value).then(_next, _throw);
따라서 현재 살펴보고 있는 예시의 경우, 직전에 yield한 값인 'asyncFunc 2' 문자열이 현재 실행되고 있는 _next 함수의 value 인자로 전달됩니다. 그리고 _next 함수는 또 다시 asyncGeneratorStep 함수를 호출하여 앞서 5번에서 살펴본 과정을 반복하게 되는데, 이를 통해 제너레이터 함수를 실행해서 직전에서 중단됐던 부분에서 실행을 재개합니다:
function* () {
  // ...
  const a = yield 'asyncFunc 2';
  console.log(a);
  // ...
}
여기서 주의할 점은, 변수 a에 저장되는 값은 yield 키워드에서 yield한 값이 아니라 next() 메서드를 호출할 때 인자로 넘긴 값이라는 사실입니다. 이 예시에선 'asyncFunc 2' 문자열을 next() 메서드의 인자로 넘겼기때문에 a에 'asyncFunc 2'가 저장되는 것이지, 'asyncFunc 2'를 yield 했기 때문에 a에 'asyncFunc 2'가 저장되는 것이 아닙니다!
이렇게 변수 a에 'asyncFunc 2'를 저장하고 나서 console.log(a)를 실행하게 됩니다.
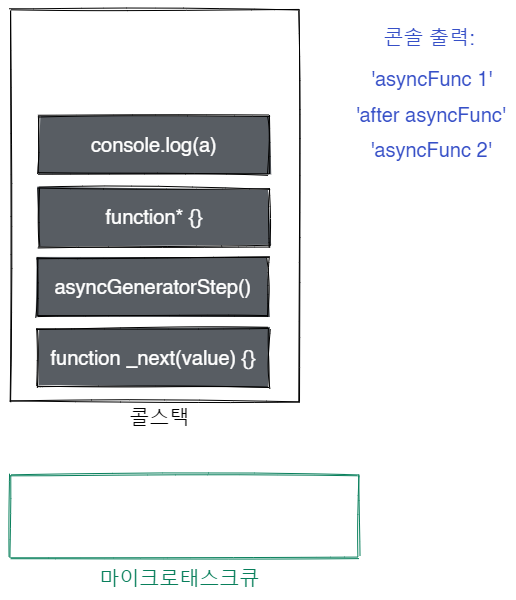
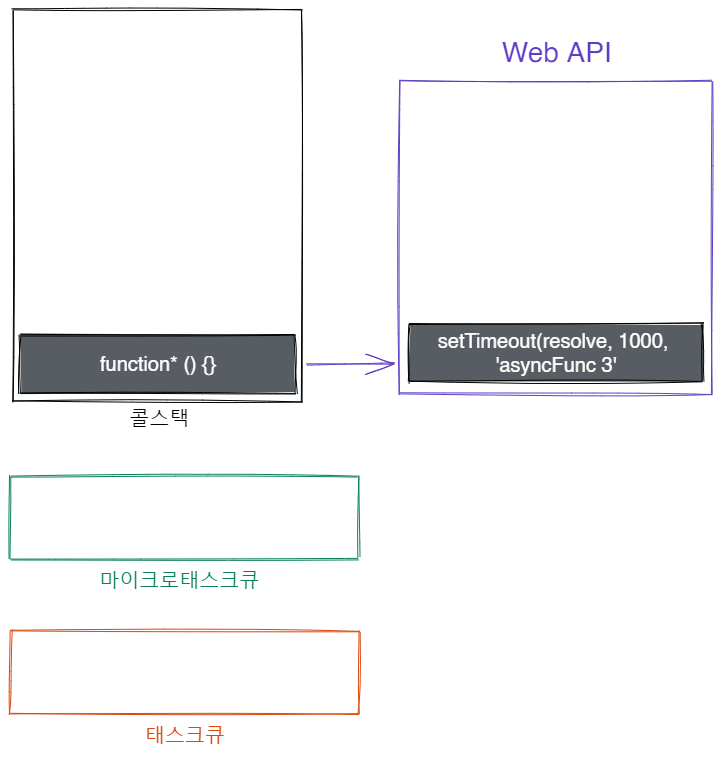
그리고 나면 1초후에 resolve되는 프로미스를 yield 하고 다시 실행을 중단하게 됩니다:
function* () {
  // ...
  const b = yield new Promise(resolve => setTimeout(resolve, 1000, 'asyncFunc 3'));  // ...
}
8.
그리고 나서 이전과 같이 Promise.resolve(value).then(_next, _throw); 구문을 통해 value로 resolve한 프로미스에 .then()을 붙여 _next를 마이크로태스크큐에 등록합니다.
이때 앞선 상황과는 다른것이, 이번에 yield된 value는 일반 값이 아니라 pending 상태에 있는, 아직 resolve 되지 않은 프로미스이므로 _next가 즉시 마이크로태스크큐에 등록되는 것이 아니라 yield된 프로미스가 resolve 될 때 등록됩니다. 이 경우 yield된 프로미스가 1초 후에 resolve 되므로 그때 마이크로태스크큐에 등록되게 됩니다.
9.
이와 같은 과정을 제너레이터 함수를 전부 실행할 때까지 반복합니다. 즉, _next() 함수에서 asyncGeneratorStep을 호출하고, asyncGeneratorStep 에선 제너레이터를 실행한 뒤 yield 하여 _next()를 마이크로태스크큐에 추가하는 과정을 반복함으로써 async 함수의 동작을 구현하게 됩니다.
그리고 제너레이터 함수의 실행이 끝나면 asyncGeneratorStep의 if(info.done) 구문이 실행되어 원래의 async 함수가 리턴하는 프로미스를 resolve 하게됩니다. 따라서 지금 살펴보고 있는 예시의 경우, 아래 코드가 최종적으로 실행되고 제너레이터 함수(즉, 원래의 async 함수)가 종료됩니다.
function*() {
  // ...
  console.log(b);
  // 암묵적으로 undefined를 리턴하므로, 원래의 async 함수가 반환하는 프로미스는
  // undefined로 resolve됩니다.
}
따라서 최종적으로, 앞서 살펴본 결과가 여태껏 살펴본 과정을 통해 출력됨을 알 수 있습니다:
asyncFunc 1
after asyncFunc
asyncFunc 2
asyncFunc 3
제너레이터가 없는 환경은 어떻게 될까?
위 코드는 async/await은 지원하지 않지만, 제너레이터는 지원하는 크롬 50버전을 기준으로 트랜스파일링한 코드입니다. 그렇다면 만약 제너레이터가 지원되지 않는, 더 이전 버전을 기준으로 트랜스파일링하면 어떻게 될까요?
트랜스파일링 결과에서 볼 수 있듯이, regeneratorRuntime 이라는 함수를 사용하여 제너레이터 함수를 대체하고 있음을 알 수 있습니다.
간혹 바벨과 웹팩등으로 구성한 환경에서 async/await을 사용할 때, regeneratorRuntime is not defined라는 에러가 발생하는 경우가 있는데, 앞서 살펴본 것처럼 제너레이터를 이용하여 async/await을 구현하기 때문에, 제너레이터가 지원되지 않는 환경에서 async/await을 사용하려고 하면 이와 같은 에러가 발생하게 됩니다.

프로미스의 경우, 프로미스를 지원하지 않는 버전이라면 프로미스를 구현한 폴리필을 추가하여 사용하게 됩니다.